
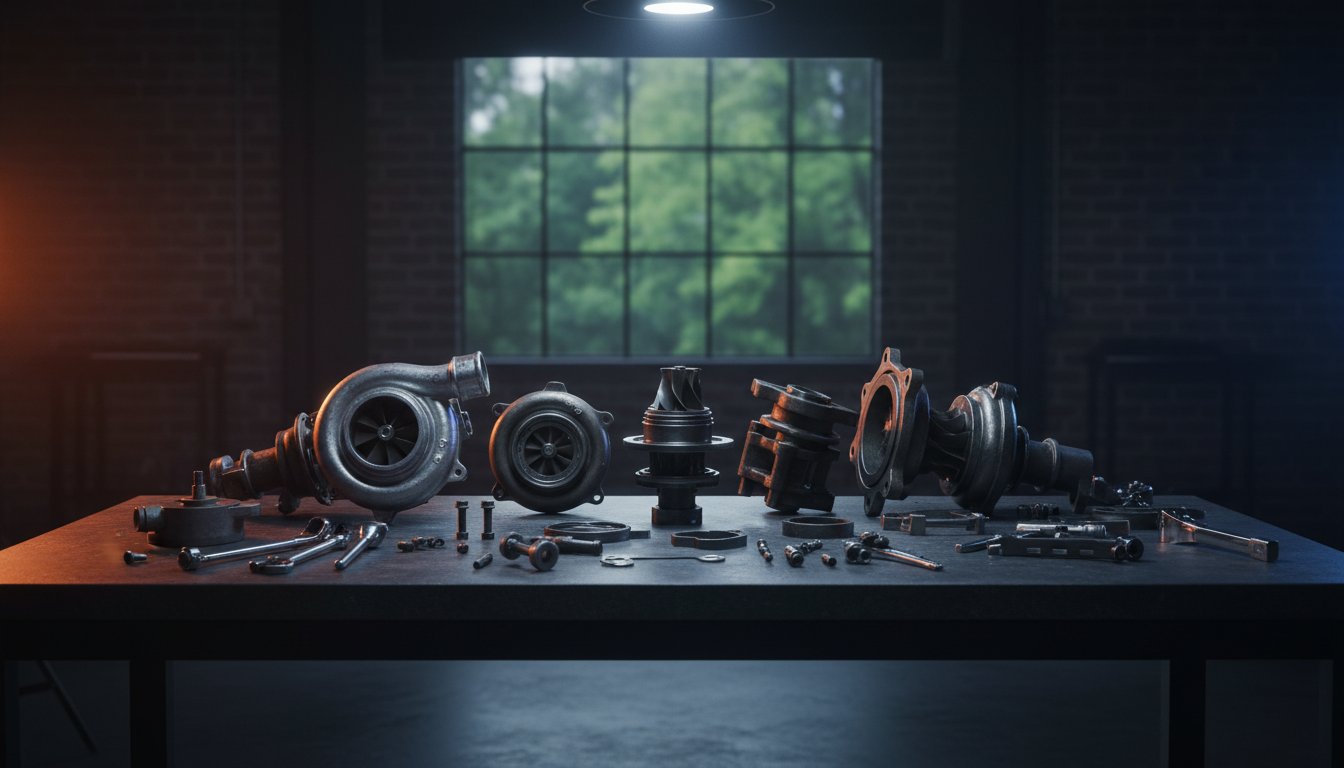
Buying a "universal" turbo kit is the fastest way to turn your 1989 Shelby CSX into a permanent lawn ornament. We know the frustration of chasing boost leaks or realizing that a generic T3 kit doesn't account for the specific Chrysler manifold flange. It's tough when parts for these 2.2L and 2.5L powerplants seem to have vanished from local shop shelves over the last 30 years. Performing a proper turbocharger repair requires more than just a wrench; it requires the right technical knowledge for these unique 1980s and 90s Garrett and Mitsubishi setups.
You want your Spirit R/T or Daytona to pull as hard as it did on the showroom floor, but finding platform-specific hardware for an L-body or G-body often feels like a scavenger hunt. This guide will show you how to restore your factory boost levels without compromising historical accuracy. You'll learn to master the nuances of these units so you don't waste time on parts that won't fit. We'll walk through the exact steps to diagnose sloppy wastegate performance and rebuild your turbo using components that actually match the Turbo Dodge specs. From identifying the differences between a Garrett T3 and a Mitsubishi TE04H to sourcing the correct seals, we have you covered.
The 1984 to 1993 Mopar era defined American front-wheel-drive performance. If you own a Shelby Dodge or a turbo Chrysler from this window, your engine relies on a specific ecosystem where the turbocharger works in tandem with "Fast Burn" or "Swirl" cylinder heads. Understanding what is a turbocharger and how it functions within these 2.2L and 2.5L platforms is the first step in any successful turbocharger repair. Failure on these vintage units often stems from decades of heat-related stress that modern, water-cooled ball-bearing turbos don't face as severely.
Normal wear for a high-mileage Garrett T3 or Mitsubishi TE04H includes minor oil seepage or a slight increase in spool time. Catastrophic failure is different. This involves broken turbine blades, seized shafts, or massive oil bypass that clouds the road behind you. Because these early Chrysler engines use a "Swirl" head design to promote combustion efficiency, a failing turbo disrupts the entire air-fuel map. This leads to poor idle and dangerous lean conditions under load. Vintage Dodge turbos are particularly prone to heat soak because early T1 units lacked the coolant passages found in later T2 and T3 setups.
Diagnosing a 2.2L Turbo I or Turbo II starts with your eyes and ears. Blue smoke from the tailpipe usually indicates that the internal oil seals have failed, allowing oil to bake in the exhaust housing. If you see thick white smoke, don't immediately assume it's a head gasket; a cracked center housing can also leak coolant into the exhaust. Listen for a high-pitched "dentist drill" whine when the car builds boost. This sound means the compressor wheel is physically scraping the cold-side housing. If you're experiencing massive boost lag, check your vacuum lines first. A 30-year-old cracked rubber line is a more common culprit than a seized turbine.
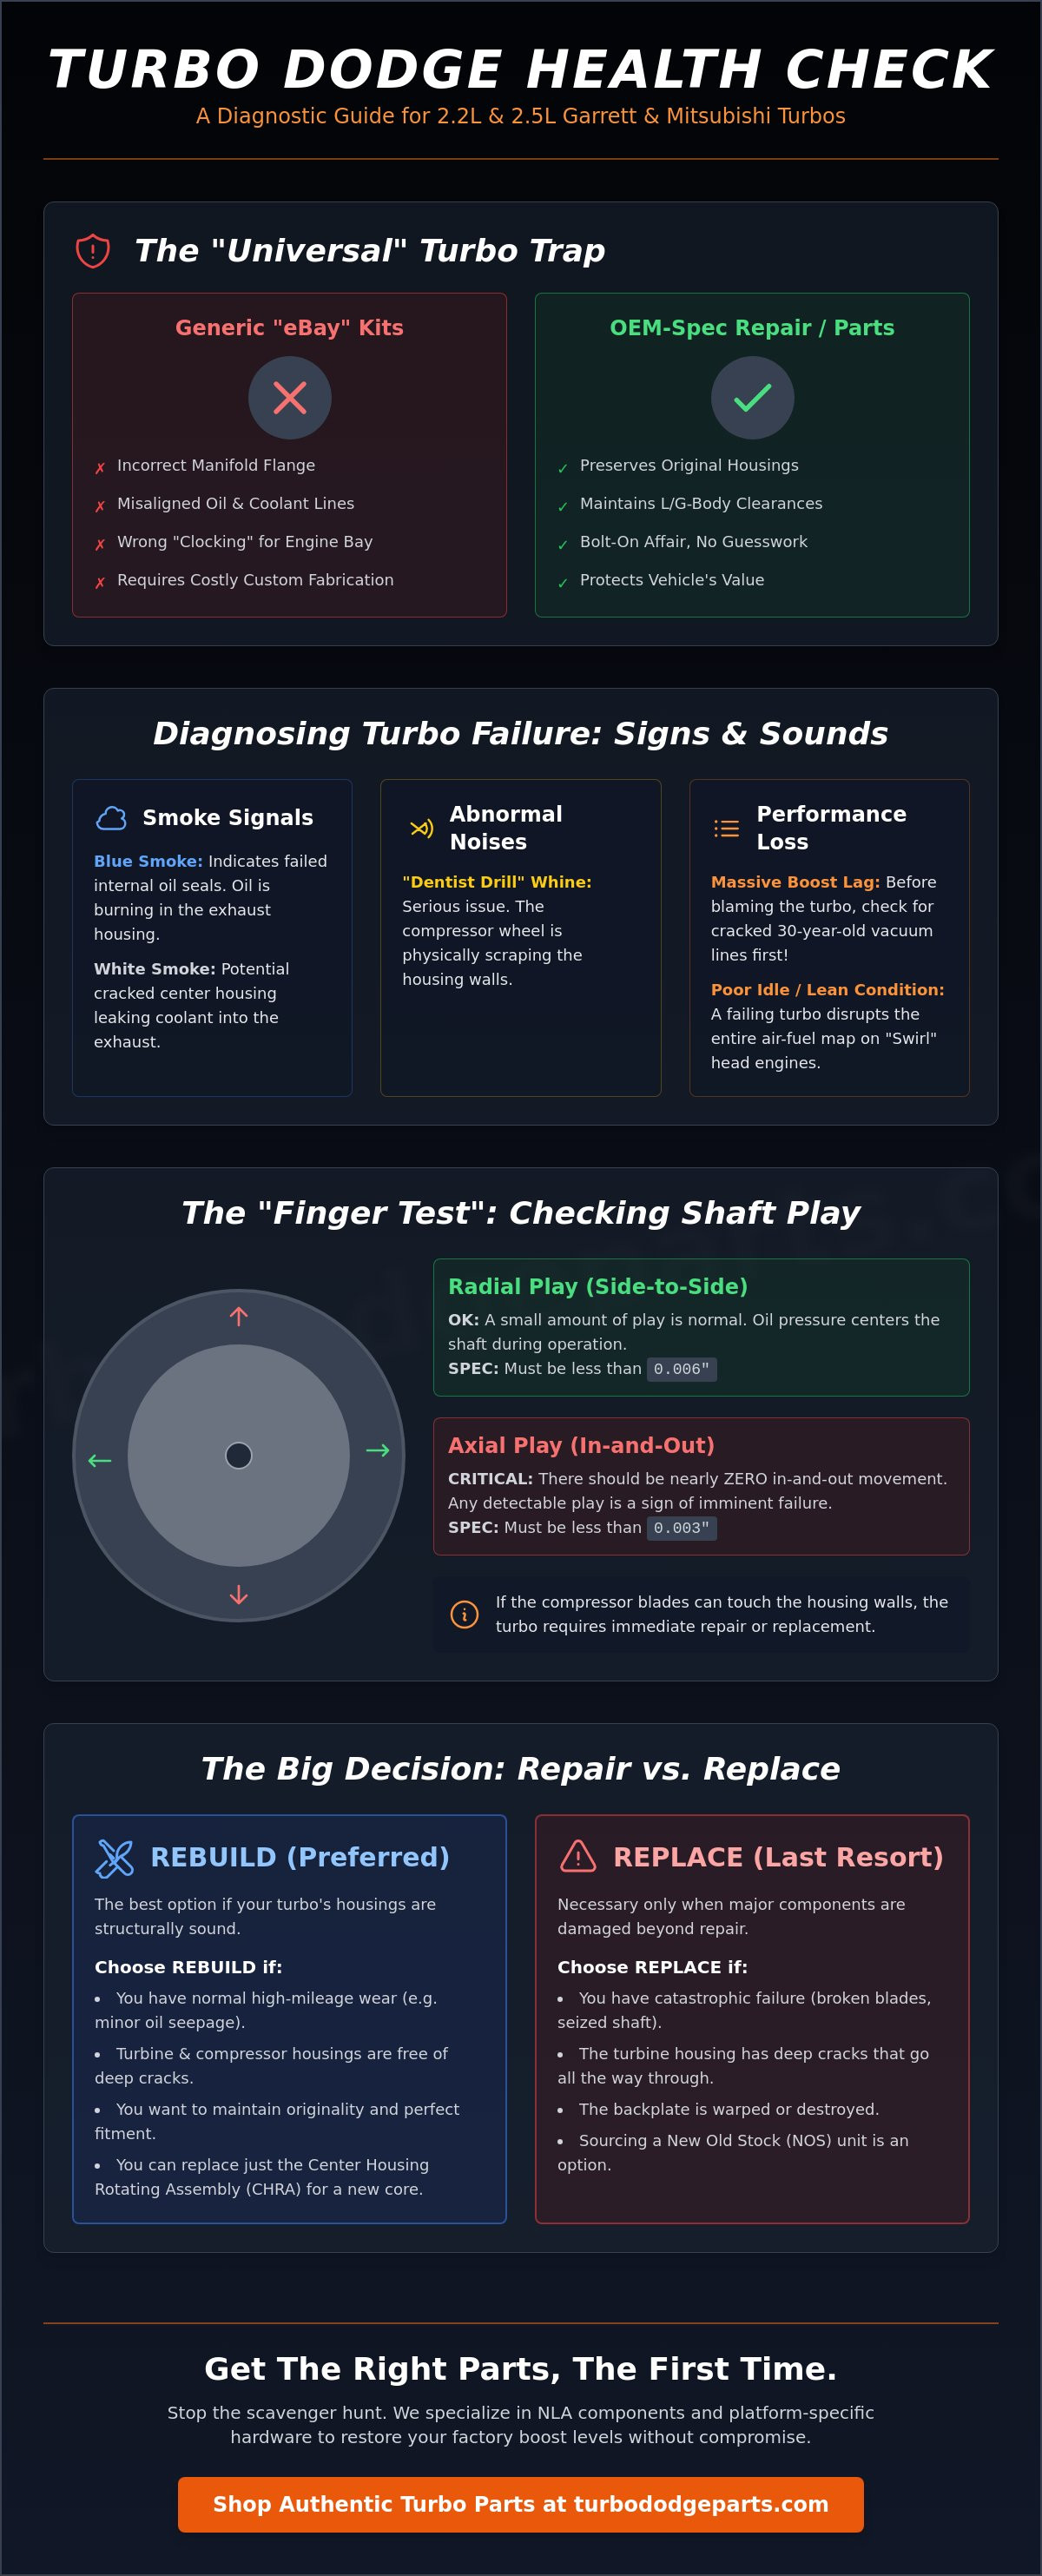
You can perform a basic health check on your Garrett T3 by removing the intake hose to expose the compressor nut. Reach in and gently wiggle the shaft. A small amount of radial play, which is side-to-side movement, is normal because the oil film centers the shaft during operation. However, there should be nearly zero axial play, or in-and-out movement. If the blades can touch the housing walls, the turbo is a "core" at best and needs an immediate turbocharger repair or replacement. For a vintage Garrett T3, radial play should not exceed 0.006 inches, while axial play must remain below 0.003 inches to prevent catastrophic internal contact.
Deciding between a professional turbocharger repair and a full replacement is the first major hurdle for any Chrysler 2.2L or 2.5L project. A rebuild is almost always the more economical path. Sourcing a New Old Stock (NOS) unit is becoming a rare feat in 2024. Most original Garrett and Mitsubishi units have been out of production for decades. Keeping your original Chrysler housings is vital for L-body and G-body owners. These engine bays offer zero margin for error. Universal turbos often lack the specific clocking needed to clear the intake manifold or the firewall.
The "eBay Turbo" trap is a common pitfall for DIY mechanics. These $200 universal units look tempting. They rarely bolt directly onto a stock 2.2L manifold. The flange might look correct; however, the swingvalve orientation and oil return lines won't align. You'll likely spend hundreds more on custom fabrication to make a "cheap" turbo fit. Before you start your turbocharger repair, inspect the turbine housing for structural integrity. Look for deep cracks around the wastegate port. Small surface checks are normal for cast iron parts from the 1980s. Cracks that go all the way through the scroll mean the housing is scrap.
Maintaining the original turbo is essential for preserving the value of numbered Shelby vehicles like the GLHS or CSX. Using the factory housings ensures your oil lines, coolant lines, and swingvalves remain in their stock locations. If your housings are in good shape, you can often save money by replacing the Center Housing Rotating Assembly (CHRA). This gives you a brand new rotating group and bearings while keeping the external parts that make the turbo a "bolt-on" affair for your specific Dodge.
Sometimes a turbo is simply beyond saving. If the backplate is ruined or the exhaust scroll has significant "chunking" from heat fatigue, it's time to move on. This is often the perfect time for an upgrade. If you're running an early T1 Log setup, switching to a T2 intercooled configuration provides a massive jump in performance. Be aware that sourcing replacement Mitsubishi TE04H housings is becoming difficult. If your Mitsubishi unit is terminal, you might need to find a donor core from a specialized parts supplier to get your Daytona or Shadow back on the road.
Rebuilding a Garrett T3 for a Turbo II or VNT application requires a mix of patience and mechanical precision. These units powered the legendary Shelby GLHS and the Spirit R/T, and they've lived through decades of heat cycles. The Garrett T3 design is robust, but it's sensitive to oil contamination and thrust loads. When you start your turbocharger repair, you must pay attention to the "clocking" of the housings. Dodge-specific oil drains require the center section to sit at a specific angle so gravity can pull oil back to the pan. If the clocking is off by even 10 degrees, oil will back up in the bearing housing and leak past the seals into your intake.
Start with the right tools. For the Mitsubishi turbocharger, you'll need a set of larger quality snap ring pliers and 6-point (vs. 12-point) sockets are recommended to reach the bolts securing the turbine housing. The biggest hurdle is usually the swingvalve bolts. These 8mm fasteners have a 13mm hex head and often seize in the cast-iron housing after 30 years of rust. Don't force them. Use a torch to get the housing cherry red before attempting removal. If you snap a bolt, you'll be spending hours with a drill and a tap.
A standard rebuild kit includes journal bearings, a thrust washer, and either a 4 piece carbon seal or the later dynamic seal set. For any 2.2L or 2.5L engine running more than 12 PSI of boost, you should upgrade to a 360-degree thrust bearing. The factory 270-degree bearing has a gap in the oil film that can fail under high-load scenarios. This upgrade provides a full circle of lubrication to handle the increased axial load of higher boost pressures.
Lubrication is the most important part of the assembly process. Use a high-quality assembly lube on the journal bearings and the shaft. Avoid dry starts at all costs. You can even use a syringe to prime the oil feed hole before you bolt the turbo back onto the manifold. This ensures the shaft is floating on a film of oil the moment the engine fires up.
The final and most critical step in your turbocharger repair is the balance of the rotating assembly. These components spin at speeds over 100,000 RPM. Even a tiny weight imbalance will cause the shaft to vibrate, which wipes out the journal bearings in less than 500 miles. If you've replaced the compressor wheel or the turbine shaft, take the assembly to a professional shop with a VSR balancer. It's the only way to ensure your vintage Chrysler stays on the road for another 100,000 miles.
Finding hardware for a 1986 Shelby Charger or a 1989 Spirit ES isn't easy. Most local parts stores stopped stocking 2.2L turbo components in the late 1990s. Turbo Dodge Parts fills this void by focusing on No Longer Available (NLA) hardware specifically for the Chrysler 2.2L and 2.5L platforms. Whether you're working on a T1 log manifold or a T2 intercooled setup, getting the right fitment is the difference between a successful turbocharger repair and a permanent oil leak. We source and manufacture parts that meet or exceed original Mopar specifications to keep these front-wheel-drive legends on the road.
If you want to try and rebuild your turbocharger yourself and are looking for a high quality rebuild kit, then we suggest contacting our friends over at GPOPSHOP.com.
Boost creep is a common headache for Dodge enthusiasts. This often happens because the swingvalve flapper inside the turbine housing is worn or binding. If the flapper doesn't open fully, exhaust gas can't bypass the wheel, causing boost to climb uncontrollably.
For high-performance 2.2L builds, heavy-duty waste gate actuators with heavier springs that prevent the puck from blowing open under high exhaust backpressure are available. This ensures your turbocharger repair holds steady boost all the way to redline.
Factory hard-lines are notorious for becoming brittle after 30 years of heat cycles. They often crack the moment you try to disconnect them during a teardown. Replacing these with modern braided stainless steel lines is a smart move. These lines handle temperatures up to 450 degrees Fahrenheit and offer the flexibility needed for custom manifold setups. The oil return line is especially critical. On Dodge platforms, this line must have a large internal diameter, typically 5/8 inch, to prevent oil from backing up into the turbo bearing housing and causing smoke.
If you want to replace your turbocharger oil and coolant lines, the original factory lines are no longer available. However, there are aftermarket braided stainless steel lines, custom made for turbo Dodge applications (not generic fit) still available from the following vendors that support the turbo Dodge enthusiast community:
While you're working on the engine, don't forget the rest of the drivetrain. Check out our custom L-body shift rods to complement your powertrain refresh and get your shifting as crisp as your boost response.
The "782" swirl head, introduced around 1986, requires specific gasket porting to ensure proper coolant flow to the turbocharger. Using a generic naturally aspirated gasket will lead to hot spots and premature failure. We stock gaskets designed for the fast-burn combustion chamber of the 2.2L and 2.5L engines. Additionally, we've engineered custom fastener kits. Many original Chrysler turbo bolts used unique pitches and flange heights that are now discontinued. Our Grade 8 and Class 10.9 hardware kits replace these rusted factory bolts, ensuring your manifold stays sealed under the pressure of 20+ psi.
Completing a turbocharger repair on a 2.2L or 2.5L Chrysler engine isn't finished until the unit is bolted down and lubricated properly. Achieving a leak-free seal between the turbo and the exhaust manifold is your first priority. These vintage manifolds often warp over decades of heat cycles. You should check the manifold flange with a straightedge before installation. Use new high-temperature studs and distorted thread lock nuts to ensure the assembly stays tight under vibration. If you have a 1989 Turbo II setup, pay close attention to the four-bolt flange alignment to prevent exhaust leaks that can kill your spool time.
Heat management is the next critical factor for success. Chrysler designed specific factory heat shields for these L-body and G-body cars for a reason. The turbo sits close to the firewall and intake charge lines. Reinstalling every shield preserves your turbocharger repair by preventing radiant heat from melting vacuum lines or cooking the paint on your hood. Don't skip these pieces just because they are difficult to reach.
You must prime the turbo with oil before the engine fires. Disconnect the ignition coil wire or the Hall Effect Pickup (HEP) connector so the engine can crank without starting. Crank the engine in 10-second intervals until the oil pressure gauge moves or the light goes out. This ensures the journal bearings are floating on a film of oil before they face the high RPMs of a running engine. Check for immediate leaks at the oil feed and return flanges during this phase.
It's normal to see a small amount of smoke rising from the exhaust housing as assembly lubricants and finger oils burn off during the first thermal cycle. This "smoke-off" period usually lasts about 10 minutes and shouldn't cause alarm if no fluid leaks are visible. Monitor your boost levels closely during the first few test drives to ensure the wastegate is calibrated to factory specs, typically 7-9 PSI for most stock T1 applications.
High-quality synthetic oil is mandatory for 80s turbo technology. These older center sections rely on a constant flow of oil for cooling and lubrication. Synthetic blends resist thermal breakdown much better than conventional oils when subjected to the extreme temperatures of a glowing turbine housing. Change your oil every 3,000 miles to keep the small oil passages clear of sludge.
Always practice a "cool down" period after driving. Let the engine idle for 60 seconds before shutting it off. This keeps oil flowing through the bearings while the turbine slows down and cools, preventing oil coking that leads to premature bearing failure. Taking these steps ensures your boost stays strong for years to come.
Ready to restore your boost? Browse our specialized Turbo Dodge engine parts here.
Restoring a vintage 2.2L or 2.5L powerplant requires more than just basic mechanical skills. It demands a deep understanding of the specific Garrett and Mitsubishi units that powered the 1980s and 90s era. You've learned how to spot early signs of failure like blue smoke or compressor wheel scoring. You also know that deciding between a rebuild and a full replacement depends on the condition of your center housing rotating assembly. Completing a successful turbocharger repair means your L-body or K-car can continue to deliver the performance it was built for decades ago.
Finding the right parts shouldn't be a hurdle for your project. We specialize in NLA Chrysler 2.2L and 2.5L components that most shops haven't seen in twenty years. From custom-engineered hardware to specific seals for your Shelby Dodge, we have the inventory to keep these machines alive. If you hit a snag during your install, call the cell or shop phone (910)232-0172 for direct enthusiast support. We're here to help you get every pound of boost back into your intake manifold. It's time to get that project out of the garage and back onto the pavement where it belongs.
Shop Specialized Turbo Dodge Restoration Parts
You can successfully complete a turbocharger repair in your own garage if you have a clean workspace and a few specialized tools. Most DIY mechanics rebuild Garrett T3 units using a 360-degree thrust bearing kit and basic hand tools. You must mark the orientation of the compressor and turbine wheels before disassembly to maintain factory balance, as these components spin at speeds exceeding 100,000 RPM.
Most turbochargers that have been in service for even a short period of time are going to require a suitable torch to heat the housing and it's bolts hot enough to get them loose without snapping them off in the housing, which you do not want to do!
The Garrett T3 is a larger, heavy-duty unit found on 1984 to 1987 T1 and T2 engines, while the Mitsubishi TE04H is a smaller turbo used on 1988 to 1992 T1 models. The T3 supports higher boost levels above 15 PSI for performance builds. The Mitsubishi unit features a 44mm compressor wheel designed for rapid spooling and better low-end throttle response in daily driving conditions.
Blue smoke during deceleration typically indicates worn turbine side (hot side) seals or excessive crankcase pressure in your 2.2L engine. When you lift off the throttle, high vacuum in the intake manifold pulls oil past the seals and into the exhaust stream. This is a common issue on cars with over 125,000 miles, so check your PCV system for clogs before you pull the turbo for service.
Side-to-side shaft play should not exceed 0.020 inches, and there should be zero detectable in-and-out axial play. If the compressor wheel can touch the housing walls when pushed to the side, the bearings are completely shot. Use a dial indicator to measure movement; any axial play over 0.005 inches requires an immediate rebuild to prevent the wheels from shattering against the housings.
You definitely need an inch-pound torque wrench to properly secure the compressor nut and the small bolts on the center housing. The 10mm hex head bolts on a Garrett T3 housing only require 175 inch-pounds of torque to prevent snapping the studs. Using a torque wrench ensures the backplate doesn't warp, which is critical for maintaining the tight tolerances required for a successful turbocharger repair.
Failing to prime the center section causes immediate bearing scoring within the first 3 seconds of engine operation. A dry start forces the shaft to spin at high speeds against brass bearings without a protective oil film. Always pull the ASD relay and crank the engine for 10 seconds to build oil pressure before you allow the engine to fire up for the first time.
You cannot bolt a Holset turbo from a 5.9L Cummins Ram directly onto a 2.2L or 2.5L engine without extensive manifold and downpipe fabrication. While some Ram trucks use a T3 flange, the physical size of an HX35 turbo is too large for the cramped L-body or G-body engine bay. It's much more efficient to use a Super 60 or a hybrid T3/T4 unit designed for the Chrysler 4-cylinder block.
You can find exact-fit replacement wastegate actuators for the T1 and T2 engine at one of the other turbo Dodge supporting vendors mentioned above. They stock the specific units used on 1984 through 1992 Chrysler vehicles. If you're running a custom 2.2L setup, they also offer adjustable actuators that allow you to fine-tune your boost curve without relying on unreliable bleed valves.